How To Clean A Bean to Cup Coffee Machine
A bean to cup coffee machine is a luxury some of us are fortunate to have in either our homes or offices. Part of owning a bean to cup machine is looking after it the way it should be.
Make sure you follow these four major cleaning schedules to ensure you keep your machine soldiering on for as long as possible, and making you the yummiest coffee it can!
How To: Clean Your Milk Frothing System
This is arguably on the most important steps of cleaning a bean to cup coffee machine. When we use the milk system, it’s inevitable some milk residue will remain. This milk sours overnight, crusts over and can eventually damage the entire milk circuit if it is allowed to stand for too long.
The two main types of milk frothing systems are integrated pipes, and the other is a milk canister.
In the case of an integrated milk frothing pipe, ensure that at least once per day the pipe is removed, rinsed, and allowed to soak in piping hot, soapy water for about 10 minutes to loosen the milk residue. Dis-assemble all the removable parts, wash them thoroughly, make sure you rinse them thoroughly, and you’re good to go.
With a removable milk carafe, carefully remove the canister and also dis-assemble all removable parts. Wash the canister out with hot soapy water, and ensure all parts that have come into contact with the milk are thoroughly washed, too.
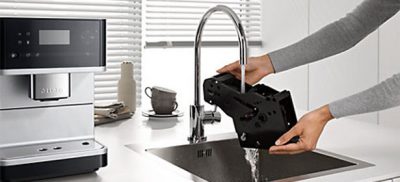
How To: Clean Your Brew Group
There are two major groups here; machines that do have removable brew groups, and those that don’t (i.e. – Jura).
Self-cleaning brew groups are a considerable benefit, allowing you to free up time and effortyou’d need to clean it out.
But, if your machine requires removing the unit to clean it, make sure you do not use any soap!
Tap all the ground coffee out of your brew group, and run it under a hot water tap until all the residue is gone. Using soap may leave sticky residue inside the part, and adversely affect the taste and quality of your coffee.
How To: Clean Your Drip Tray and Grounds Container
This must surely take first place for being the annoying little job you know you have to do. Every. Single. Day. But, it must be done!
Some drip trays are fitted with a flotation marker device which indicates when the water level is high enough to require an immediate cleaning. With others, well, you’ve just got to keep an eye on them. Make sure you’ve sturdily got the drip tray in your hands, and tip the water out. If the drip tray has had any milk or coffee product spilled inside, a quick rinse under the hot water tap won’t hurt anyone.
The grounds container (the container that catches the “pucks” of coffee used after each cup) all have their own capacity. Larger office coffee machines may have a capacity of up to 50 pucks, while smaller home machines will have a capacity of about 10 pucks. I’ve grouped together the drip tray cleaning and grounds container cleaning because they’re usually located directly behind one another.
Simply tip out the ground coffee, give it a quick rinse, replace it and you’re “A for away.”
How To: De-calcify
If you have used any type of water other than purified water, chances are you will have a bit of calcium build up. There’s nothing wrong or gross about this – unless you leave it long enough for calcified particles to begin breaking off into your coffee.
Your machine will either have specific decalcifying tablets or liquid that is compatible with it; the correct way to use these two types of de-calcification methods is as follows:
For tablets, drop the tablet into the override doser (the small circular area, close to your beans container into which you can also add pre-ground coffee) or into the water tank. It’s important to make sure you’re 100% familiar with which if these two methods to use, as the wrong one may cause damage to your machine.
Ensure there is sufficient water in your water tank, and select the decalcifying option on your machine,. The cycles take about 20 minutes to run to completion; once completed, ensure you allow for a full rinse cycle to run, to make sure all of the cleaning product has been removed.
When using decalcifying liquid, apply the suggested amount of detergent directly into the water tank. Follow through the same way we outlined above, making sure you allow a full rinse cycle thereafter.
Following these easy steps can make a world of difference!